Documentation
Set up your kit, talk to the board from your own code, and look up what every module sends and understands.
Quick start
For parents, schools and learners
You describe what you want to build, Atech picks the modules and writes the firmware, and you upload it to the board from the browser. No soldering and nothing to install.
Chrome, Edge, Brave, Opera or Arc. Uploading uses Web Serial, which Firefox, Safari and phone browsers do not have.
Charge-only cables cannot program the board. One that came with a phone or laptop works.
- 1Describe what to build
Log in at atech.dev/editor and type your idea in the prompt box, for example “a button toggles the light grid”. You get a board diagram and generated firmware.
- 2Put the modules where the diagram shows
Slide each module into its port and push it in firmly. You can rearrange them in the editor at any time; the firmware is rebuilt for the new layout.
- 3Plug in the board
USB-C from the board to your computer. No driver needed.
- 4Pick WiFi or USB
On WiFi, open the connection pill and add your WiFi credentials so the board can join your network. On USB, open the pill and click “Connect device via USB” once.
- 5Upload the code
Click “Upload Code”. The board restarts, and its events start streaming in the connection pill.
Build with your own agent
For software developers, vibe-coders and companies
You can skip the editor and build with Claude Code, Codex, Cursor, Lovable or any coding agent that can run Python. The open-source Atech SDK gives the agent the module catalogue, each module's API and a bundled compiler that builds and flashes the board offline. No account needed.
1. Install the SDK
pip install atech
2. Give your agent this prompt
Paste it into the agent's chat, then describe what you want to build. It asks which board and modules you have before it writes any code.
Install the Atech Python SDK and use it to build my project:

    pip install atech

Atech is a modular electronics platform: pre-built hardware modules snap into
numbered ports on an ESP32 motherboard, with no soldering or wiring. The SDK
ships the module catalog, each module's API, and a bundled compiler that builds
and flashes the board offline.

Before you write any code, ask me:

1. Which Atech board do I have, and how many ports does it have?
2. Which modules do I own? Run `atech list-modules` to see every module the
   SDK knows about, and ask me which of those I actually have in hand.
3. Which port is each module plugged into?

If I don't have a board yet, or I'm missing a module the build needs, point me
to https://atech.dev/buy and suggest which kit fits what I described.

Then:

- Write the project file describing the build, using only modules I confirmed
  I own and the ports I confirmed they're in.
- Run `atech build` and fix anything it reports.
- Run `atech upload` to flash my board, and tell me what to expect it to do.
3. What the agent runs
atech list-modulesEvery module in the catalog, with its API.atech buildCompile the project to ESP32 firmware, offline.atech uploadFlash the board over USB-C.
The SDK is Python and open source, on PyPI. No board yet? Your agent will point you to a kit that fits.
The board
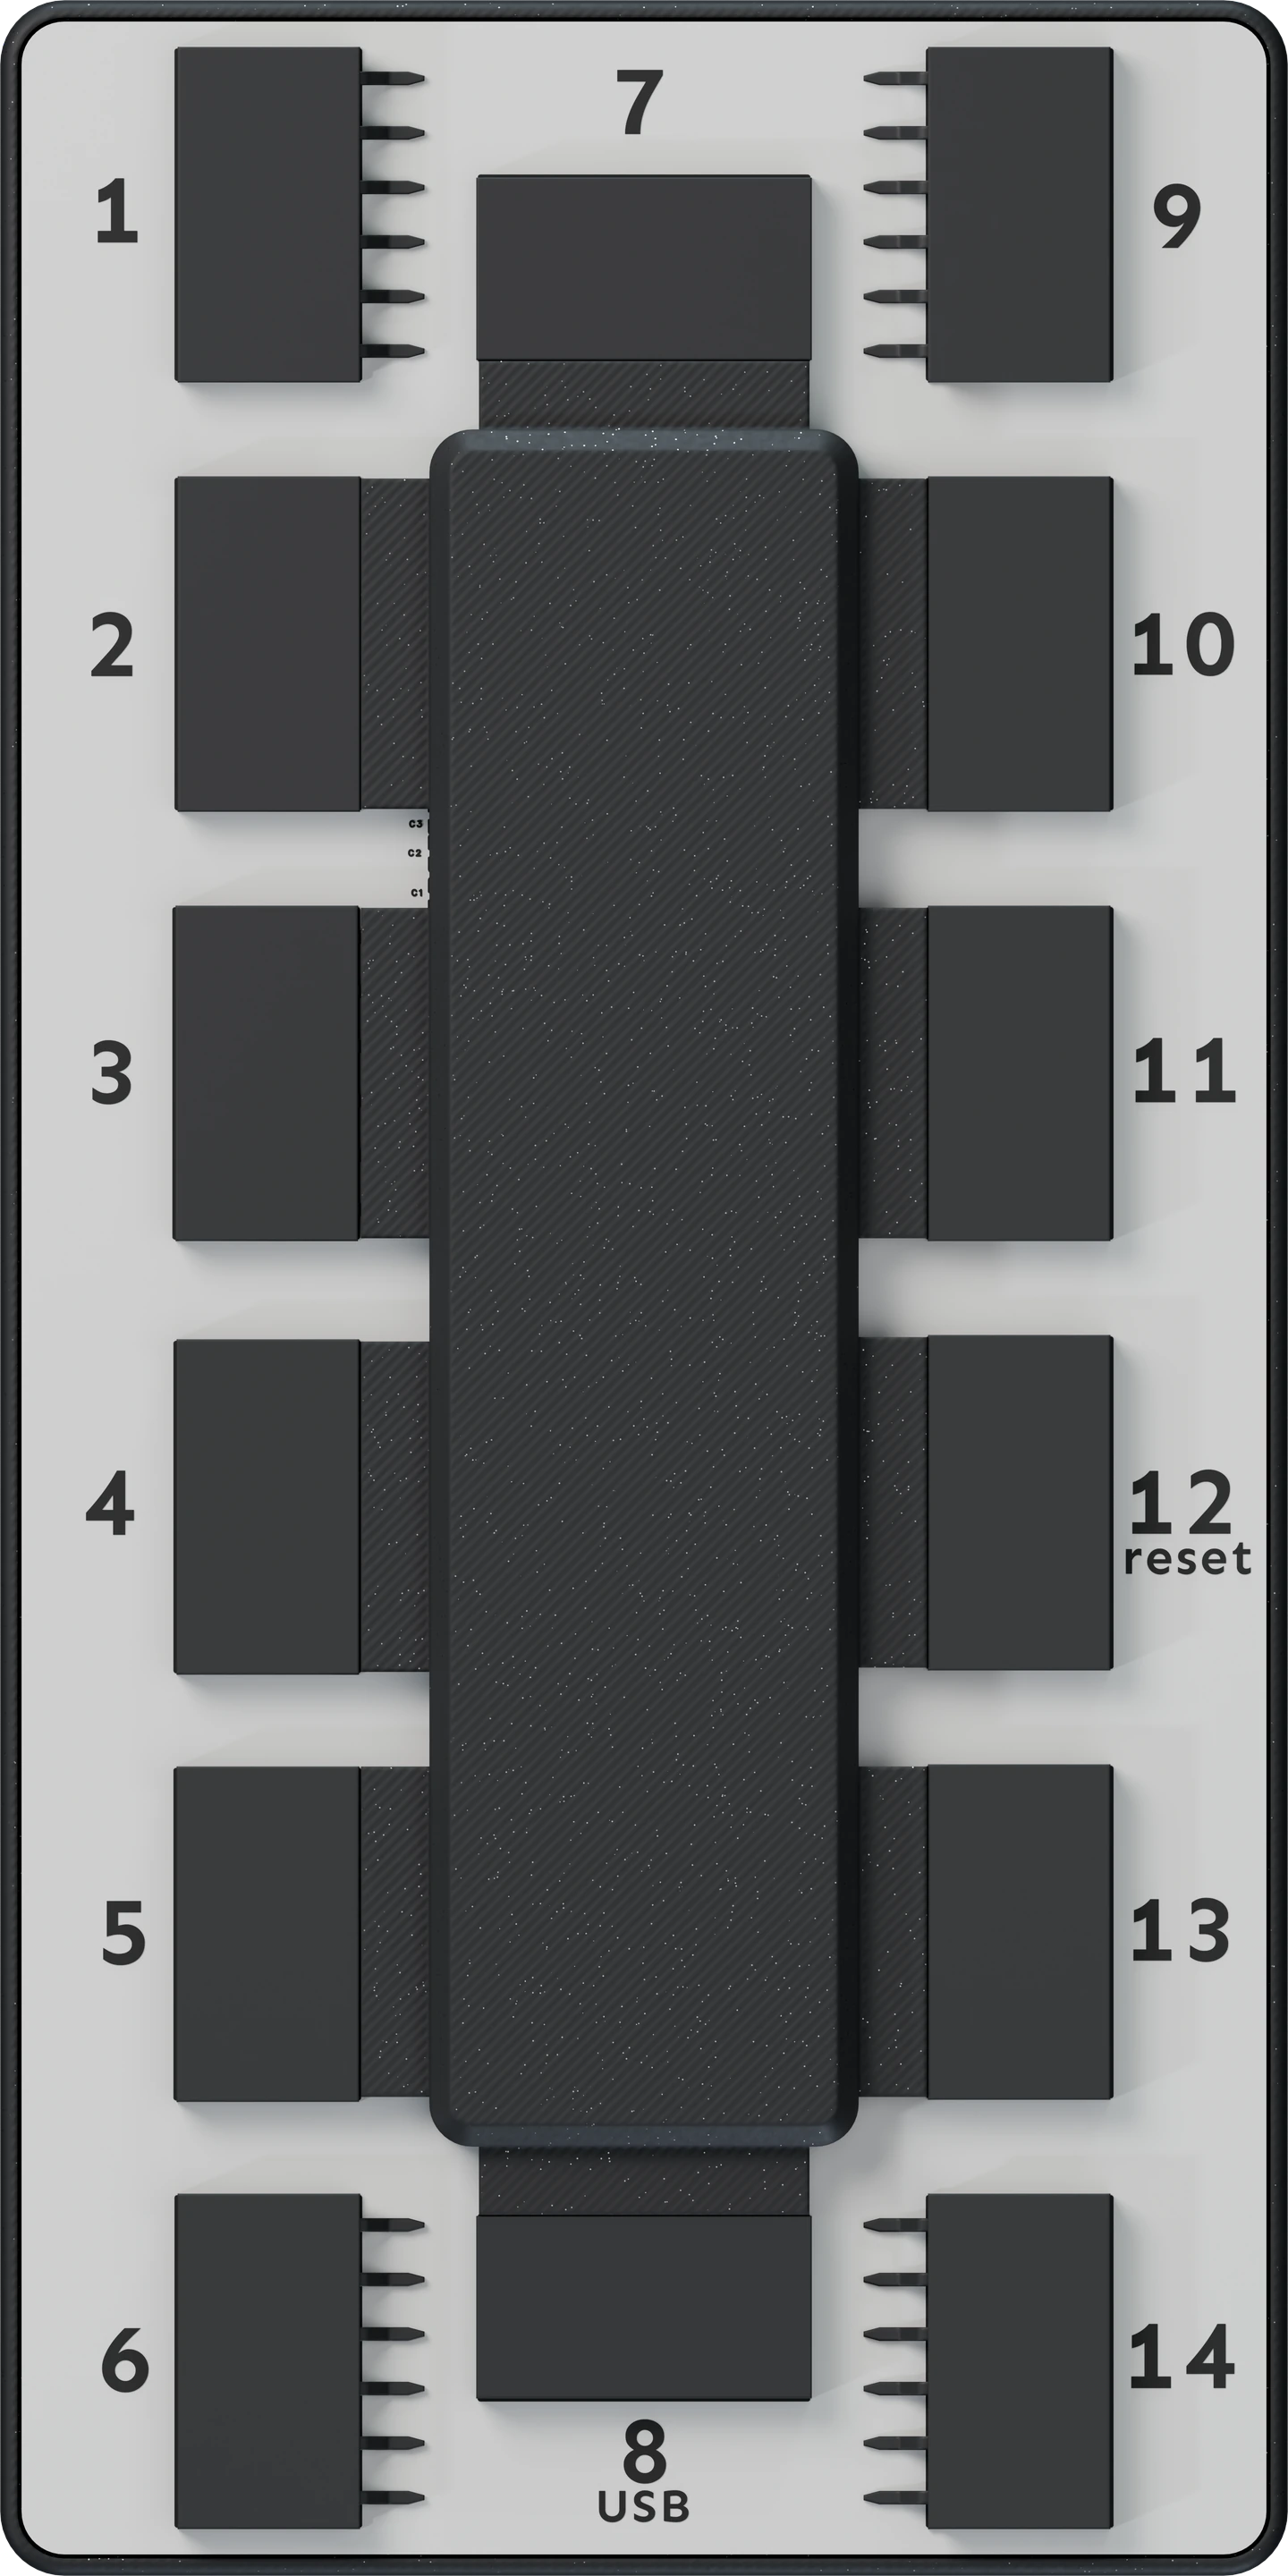
Every kit uses the same motherboard: an ESP32-S3 with 12 module ports around its edge. The port numbers are printed on the board.
- Module ports: 1–7, 9–11 and 13–14.
- 8 is the USB-C socket and 12 is the reset button.
- Most modules take one port. Double-width modules (Color Display, Big Screen, Knob, Microphone, Speaker) take two neighbouring ports on the same side: 1–2, 2–3, 3–4, 4–5, 5–6, 9–10, 10–11, 13–14.
The firmware is built for the ports in your project's diagram. If you move a module on the board, move it in the editor too and upload again.
Events & actions
A running board speaks JSON, and there are only two kinds of message. Events come from the board on their own: a sensor reading, a button press. Actions are commands you send to it: set a colour, play a tone, draw text.
// Event — the board tells you something
{
  "event_type": "sensor",        // sensor | button | state | log
  "key":        "temperature",   // which reading; listed per module below
  "value":      23.4             // number, string, object or bool
}

// Action — you tell the board to do something
{
  "action": "set_color",         // listed per module below
  "value":  { "r": 255, "g": 0, "b": 0 }
}
Which keys and actions exist depends on the modules in your build. The module reference lists them all, with an example for each.
Connect from code
There are two ways to reach the board, chosen per project with the WiFi / USB toggle in the editor. The event and action payloads are the same on both; only the wrapper around them differs. Switching transport rebuilds the firmware.
The board runs on its own. Control it from another machine, a phone or a deployed web app.
- Address
- wss://gateway.atech.dev/ws/live/<project id>
- From board
- { "type": "device_event", "payload": {…} }
- To board
- { "type": "send_to_device", "device_id": "<project id>", "payload": {…} }
Local and offline. The computer the board is plugged into talks straight to it, no cloud.
- Port
- 115200 baud, one JSON object per line
- From board
- { "type": "event", "payload": {…} }
- To board
- { "action": "…", "value": … }
Your project id is in the editor: open the project's Docs tab and look under Your project.
Over WiFi
const PROJECT_ID = "<your project id>";
const ws = new WebSocket(`wss://gateway.atech.dev/ws/live/${PROJECT_ID}`);

// Every event the board sends
ws.onmessage = (e) => console.log(JSON.parse(e.data));

// Send an action
ws.onopen = () => ws.send(JSON.stringify({
  type: "send_to_device",
  device_id: PROJECT_ID,
  payload: { action: "set_color", value: { r: 255, g: 0, b: 0 } },
}));
Over USB
// Browser, Web Serial API
const port = await navigator.serial.requestPort();
await port.open({ baudRate: 115200 });

const writer = port.writable.getWriter();
const enc = new TextEncoder();
const send = (action) => writer.write(enc.encode(JSON.stringify(action) + "\n"));

// Read the board's events, one JSON object per line
const reader = port.readable.pipeThrough(new TextDecoderStream()).getReader();
(async () => {
  let buf = "";
  while (true) {
    const { value, done } = await reader.read();
    if (done) break;
    buf += value;
    let i;
    while ((i = buf.indexOf("\n")) >= 0) {
      console.log(buf.slice(0, i));
      buf = buf.slice(i + 1);
    }
  }
})();

// Send an action
send({ action: "set_color", value: { r: 255, g: 0, b: 0 } });
Module reference
Every event a module sends and every action it accepts, each with an example. Open a module to see its list.
 Temperature & Humidity2 events
Module id aht20_sensor
Events — the board sends these
temperaturefloat · CTemperature reading in Celsius
{ "type": "sensor", "key": "temperature", "value": 23.5, "module_type": "aht20" }humidityfloat · %RHRelative humidity percentage
{ "type": "sensor", "key": "humidity", "value": 65.2, "module_type": "aht20" }
 Air Quality3 events
Module id scd40_air_quality
Events — the board sends these
co2int · ppmCO2 concentration in parts per million
{ "type": "sensor", "key": "co2", "value": 712, "module_type": "scd40" }temperaturefloat · CTemperature reading in Celsius (from the SCD40's onboard sensor used for CO2 compensation)
{ "type": "sensor", "key": "temperature", "value": 23.5, "module_type": "scd40" }humidityfloat · %RHRelative humidity percentage (from the SCD40's onboard sensor used for CO2 compensation)
{ "type": "sensor", "key": "humidity", "value": 48.1, "module_type": "scd40" }
 Distance Sensor2 events
Module id vl53l5cx_distance
Events — the board sends these
distanceint · mmDistance measurement in millimeters
{ "type": "sensor", "key": "distance", "value": 1250, "module_type": "vl53l5cx" }min_distanceint · mmMinimum distance across all 64 zones
{ "type": "sensor", "key": "min_distance", "value": 450, "module_type": "vl53l5cx" }
 Orientation Sensor11 events
Module id icm40608_imu
Events — the board sends these
accel_xfloat · gX-axis acceleration in g
{ "type": "sensor", "key": "accel_x", "value": 0.98, "module_type": "icm40608" }accel_yfloat · gY-axis acceleration in g
{ "type": "sensor", "key": "accel_y", "value": 0.05, "module_type": "icm40608" }accel_zfloat · gZ-axis acceleration in g
{ "type": "sensor", "key": "accel_z", "value": 0.12, "module_type": "icm40608" }gyro_xfloat · deg/sX-axis rotation rate in degrees/second
{ "type": "sensor", "key": "gyro_x", "value": 12.5, "module_type": "icm40608" }gyro_yfloat · deg/sY-axis rotation rate in degrees/second
{ "type": "sensor", "key": "gyro_y", "value": -5.2, "module_type": "icm40608" }gyro_zfloat · deg/sZ-axis rotation rate in degrees/second
{ "type": "sensor", "key": "gyro_z", "value": 0.8, "module_type": "icm40608" }pitchfloat · degPitch angle (nose up/down), -90..+90
{ "type": "sensor", "key": "pitch", "value": 15.2, "module_type": "icm40608" }rollfloat · degRoll angle (left/right tilt), -180..+180
{ "type": "sensor", "key": "roll", "value": -8.4, "module_type": "icm40608" }tiltfloat · degTotal tilt from upright (0 = flat face-up, 180 = flat face-down)
{ "type": "sensor", "key": "tilt", "value": 12, "module_type": "icm40608" }orientationstringCoarse orientation: face_up, face_down, edge_right, edge_left, edge_front, edge_back, unknown
{ "type": "state", "key": "orientation", "value": "face_up", "module_type": "icm40608" }shakeintEdge-triggered shake/tap event (fires once per spike >1.8g)
{ "type": "button", "key": "shake", "value": 1, "module_type": "icm40608" }
 Button2 events
Module id button_module
Events — the board sends these
button_pressintButton press event (value=1)
{ "type": "button", "key": "button_1", "value": 1 }button_releaseintButton release event (value=0)
{ "type": "button", "key": "button_1", "value": 0 }
 Light Grid7 actions
Module id neopixel_grid
Actions — you send these
set_colorrgb_objectSet all LEDs to RGB color
{ "action": "set_color", "value": { "r": 255, "g": 0, "b": 0 } }brightnessintSet LED brightness (0-255)
{ "action": "brightness", "value": 128 }clearno valueTurn off all LEDs
{ "action": "clear", "value": null }set_pixelpixel_objectLight a single LED by linear index (0-8 for 3x3 grid). r/g/b are 0-255.
{ "action": "set_pixel", "value": { "index": 4, "r": 255, "g": 0, "b": 0 } }set_pixel_xypixel_xy_objectLight a single LED by row/column (0-2 each on the 3x3 grid)
{ "action": "set_pixel_xy", "value": { "row": 1, "col": 1, "r": 255, "g": 0, "b": 0 } }set_rowpixel_row_objectSet every LED in row N (0-2) to RGB
{ "action": "set_row", "value": { "row": 0, "r": 0, "g": 255, "b": 0 } }set_columnpixel_col_objectSet every LED in column N (0-2) to RGB
{ "action": "set_column", "value": { "col": 0, "r": 0, "g": 0, "b": 255 } }
 Color Display11 actions · 2 ports
Module id st7735_tft
Actions — you send these
display_textstringDisplay text on a cleared screen using the default font (white on black)
{ "action": "display_text", "value": "Hello World" }draw_textstyled_text_objectDraw text at (x, y) with size multiplier and RGB565 color. Does NOT clear screen first.
{ "action": "draw_text", "value": { "text": "Hi", "x": 10, "y": 20, "size": 2, "color": 65535 } }draw_pixelpoint_objectDraw a single pixel at (x, y) in RGB565 color
{ "action": "draw_pixel", "value": { "x": 80, "y": 40, "color": 65504 } }draw_lineline_objectDraw a line from (x0, y0) to (x1, y1) in RGB565 color
{ "action": "draw_line", "value": { "x0": 0, "y0": 0, "x1": 159, "y1": 79, "color": 65535 } }draw_rectrect_objectDraw an unfilled rectangle outline at (x, y) with size (w, h) in RGB565 color
{ "action": "draw_rect", "value": { "x": 20, "y": 20, "w": 40, "h": 30, "color": 2016 } }fill_rectrect_objectDraw a filled rectangle at (x, y) with size (w, h) in RGB565 color
{ "action": "fill_rect", "value": { "x": 20, "y": 20, "w": 40, "h": 30, "color": 63488 } }draw_circlecircle_objectDraw an unfilled circle outline centered at (x, y) with radius r in RGB565 color
{ "action": "draw_circle", "value": { "x": 80, "y": 40, "r": 20, "color": 2047 } }fill_circlecircle_objectDraw a filled circle centered at (x, y) with radius r in RGB565 color
{ "action": "fill_circle", "value": { "x": 80, "y": 40, "r": 20, "color": 2047 } }fill_screenintFill the entire screen with a single RGB565 color (use 0 for black, 65535 for white)
{ "action": "fill_screen", "value": 0 }set_rotationintSet display rotation: 0 = portrait, 1 = landscape (default), 2 = portrait flipped, 3 = landscape flipped
{ "action": "set_rotation", "value": 1 }clear_screenno valueClear the display to black
{ "action": "clear_screen", "value": null }
 Big Screen11 actions · 2 ports
Module id st7789_tft
Actions — you send these
display_textstringDisplay text on a cleared screen using the default font (white on black)
{ "action": "display_text", "value": "Hello World" }draw_textstyled_text_objectDraw text at (x, y) with size multiplier and RGB565 color. Does NOT clear screen first.
{ "action": "draw_text", "value": { "text": "Hi", "x": 20, "y": 60, "size": 2, "color": 65535 } }draw_pixelpoint_objectDraw a single pixel at (x, y) in RGB565 color
{ "action": "draw_pixel", "value": { "x": 160, "y": 120, "color": 65504 } }draw_lineline_objectDraw a line from (x0, y0) to (x1, y1) in RGB565 color
{ "action": "draw_line", "value": { "x0": 0, "y0": 0, "x1": 319, "y1": 239, "color": 65535 } }draw_rectrect_objectDraw an unfilled rectangle outline at (x, y) with size (w, h) in RGB565 color
{ "action": "draw_rect", "value": { "x": 40, "y": 60, "w": 80, "h": 90, "color": 2016 } }fill_rectrect_objectDraw a filled rectangle at (x, y) with size (w, h) in RGB565 color
{ "action": "fill_rect", "value": { "x": 40, "y": 60, "w": 80, "h": 90, "color": 63488 } }draw_circlecircle_objectDraw an unfilled circle outline centered at (x, y) with radius r in RGB565 color
{ "action": "draw_circle", "value": { "x": 160, "y": 120, "r": 40, "color": 2047 } }fill_circlecircle_objectDraw a filled circle centered at (x, y) with radius r in RGB565 color
{ "action": "fill_circle", "value": { "x": 160, "y": 120, "r": 40, "color": 2047 } }fill_screenintFill the entire screen with a single RGB565 color (use 0 for black, 65535 for white)
{ "action": "fill_screen", "value": 0 }set_rotationintSet display rotation: 0 = portrait, 1 = landscape upright on a left-side pair, 2 = portrait flipped, 3 = landscape upright on a right-side pair. Boot already picks the right landscape for the board side.
{ "action": "set_rotation", "value": 1 }clear_screenno valueClear the display to black
{ "action": "clear_screen", "value": null }
 DC Motor3 actions
Module id dc_motor
Actions — you send these
motor_speedintSet motor speed (-255 to +255, negative=reverse)
{ "action": "motor_speed", "value": 200 }motor_stopno valueCoast to stop (free spin, no holding torque)
{ "action": "motor_stop", "value": null }motor_brakeno valueActive brake (short the motor terminals — stops faster, holds position briefly)
{ "action": "motor_brake", "value": null }
 Knob2 events · 2 actions · 2 ports
Module id rotary_encoder_knob
Events — the board sends these
knob_positionintCurrent encoder position (cumulative turns)
{ "type": "sensor", "key": "knob_position", "value": 42, "module_type": "rotary_encoder" }knob_pressintKnob button pressed
{ "type": "button", "key": "knob_press", "value": 1 }
Actions — you send these
set_ring_colorrgb_objectSet LED ring color
{ "action": "set_ring_color", "value": { "r": 255, "g": 0, "b": 0 } }set_ring_brightnessintSet LED ring brightness (0-255)
{ "action": "set_ring_brightness", "value": 128 }
 Microphone2 events · 2 ports
Module id microphone
Events — the board sends these
sound_levelintRMS sound level (0-32767)
{ "type": "sensor", "key": "sound_level", "value": 1200, "module_type": "microphone" }sound_detectedintSound above threshold detected
{ "type": "button", "key": "sound_detected", "value": 1 }
 Robot Arm Integrator2 events · 4 actions
Module id robot_arm
Events — the board sends these
joint_positionsstringAll 6 joint positions as comma-separated values (0-4095 each)
{ "type": "sensor", "key": "joint_positions", "value": "2048,2048,2048,2048,2048,2048", "module_type": "robot_arm" }joint_tempint · CJoint temperature in Celsius (specify joint in module_type)
{ "type": "sensor", "key": "joint_temp", "value": 38, "module_type": "robot_arm" }
Actions — you send these
move_jointstringMove a single joint: value is 'joint_id:position[:time_ms]' e.g. '3:2048:500'
{ "action": "move_joint", "value": "3:2048:500" }move_allstringMove all 6 joints: value is 'p1,p2,p3,p4,p5,p6[:time_ms]' e.g. '2048,2048,2048,2048,2048,2048:1000'
{ "action": "move_all", "value": "2048,2048,2048,2048,2048,2048:1000" }center_allstringCenter all joints to 2048. Value is optional time_ms e.g. '1000'
{ "action": "center_all", "value": "1000" }set_torquestringSet torque: value is 'on' or 'off' (all joints)
{ "action": "set_torque", "value": "on" }
 Speaker5 actions · 2 ports
Module id speaker
Actions — you send these
play_tonefrequency_objectPlay a tone at given frequency for duration (ms)
{ "action": "play_tone", "value": { "frequency": 440, "duration": 1000 } }speaker_stopno valueStop any sound
{ "action": "speaker_stop", "value": null }play_notefrequency_objectLike play_tone but with a short gap between notes — better for melodies (85% sound, 15% silence)
{ "action": "play_note", "value": { "frequency": 523, "duration": 250 } }play_chordchord_objectPlay multiple frequencies simultaneously (max 4) for the given duration in ms
{ "action": "play_chord", "value": { "frequencies": [ 261, 329, 392 ], "duration": 600 } }set_volumefloatSet output volume (0.0 silent .. 1.0 max). Persists across tones.
{ "action": "set_volume", "value": 0.5 }
 Soil Sensor4 events · 7 actions
Module id soil_sensor
Events — the board sends these
moisturefloat · %Calibrated soil moisture, 0-100 %
{ "type": "sensor", "key": "moisture", "value": 42.7, "module_type": "soil_sensor" }conductancefloat · uSConductance between the prongs in microsiemens — the uncalibrated physical measurement
{ "type": "sensor", "key": "conductance", "value": 18.4, "module_type": "soil_sensor" }soil_rawint · countsRaw oversampled ADC reading, 0-65472. High means dry. Record this when calibrating
{ "type": "sensor", "key": "soil_raw", "value": 31200, "module_type": "soil_sensor" }soilstringProbe condition: warming up, probe open, saturated, or ok
{ "type": "state", "key": "soil", "value": "probe open" }
Actions — you send these
calibrate_dryno valueRecord the current reading as the 0% point. Call with the probe held in air
{ "action": "calibrate_dry", "value": null }calibrate_wetno valueRecord the current reading as the 100% point. Call with the prongs standing in water
{ "action": "calibrate_wet", "value": null }read_nowno valueForce an immediate measurement instead of waiting for the next timer tick
{ "action": "read_now", "value": null }set_status_colorstringSet the on-module status LED, as "r,g,b" with each 0-255. Takes the LED out of its automatic red-to-green-to-blue moisture ramp until set_status_auto
{ "action": "set_status_color", "value": "0,40,0" }set_status_autono valueReturn the status LED to its automatic moisture ramp: red dry, green moist, blue submerged
{ "action": "set_status_auto", "value": null }set_status_offno valueTurn the on-module status LED off. set_status_auto turns it back on
{ "action": "set_status_off", "value": null }set_status_brightnessintBrightness of the automatic LED ramp, 0-255; default 24
{ "action": "set_status_brightness", "value": 24 }
Troubleshooting
The board will not connect, or the upload fails
- Unplug the USB cable from the board, wait a second, plug it back in and try again. This fixes most cases.
- Close anything else that holds the port: another atech.dev tab (only one tab can use the board at a time) or the Arduino IDE Serial Monitor.
- Use a data USB-C cable. Many cables are charge-only and cannot program the board.
- Plug straight into the computer, not through a hub.
- Press the board's reset button, then try again.
- On Linux, your user has to be in the
dialoutgroup.
There is no way to upload from my browser
The upload finished but the board stays offline
My code connects but nothing arrives
The connection is refused or closes at once
I send an action and the board ignores it
Get help
Stuck, or found something that does not work as described here? Ask in Discord, where the team and other builders answer, or write to [email protected].
Or add Atech to your assistant for good: in Claude (Settings, Connectors) or ChatGPT (Settings, Connectors) add a connector with the address https://atech.dev/mcp. It then answers from these docs every time, nothing to paste.